Background

Tuesday, October 9, 2012

The Paper Shelter (TPS) Challenge #85 - Love Beats All

For this week's challenge, I got my inspiration from the traditional rhyme, in which describes what a bride should wear at her wedding for good luck....

Something old, 
something new,
something borrowed,
something blue,
& a sixpence in her shoe

There were these empty wooden boxes that I had for a long, long time. So long that I can't even remember where I got them from.... LOL! I was digging through my stash when I found them. I thought it would be a great idea if I incorporated it into this week's challenge so I decided to make it into a decorative, mini shadowbox frame box that would make a wonderful little wedding gift for someone. :)

How the box looks when it's open

I used Teresa Collins - Everyday Moments paper kit collection. I didn't want this project to turn out extremely girly so that the groom would also be able to appreciate the gift. I fell in love with the beautiful, royal blue from this collection & knew almost instantly that it would be my main choice of colour.

I used 2 boxes & with a strip of patterned CS, I made a long paper hinge to hold the boxes together. Then, I covered the 2 boxes with the royal blue patterned CS. To ensure that my box doesn't open up voluntarily, I added a brass catch. The brass catch compliments my paper very well & it further enhances the ornate feel of the box.

The cover of the box

The Brass catch

To break the stiffness the box, I added 2 strips of ribbons & stuck ends under the mats of the front & back so that I'm still able to open my box. To make it more interesting, I added a key & lock charm to the ribbons

How the ribbons will look when the box is closed

How the ribbons will look when the box is opened

Close-up of the image

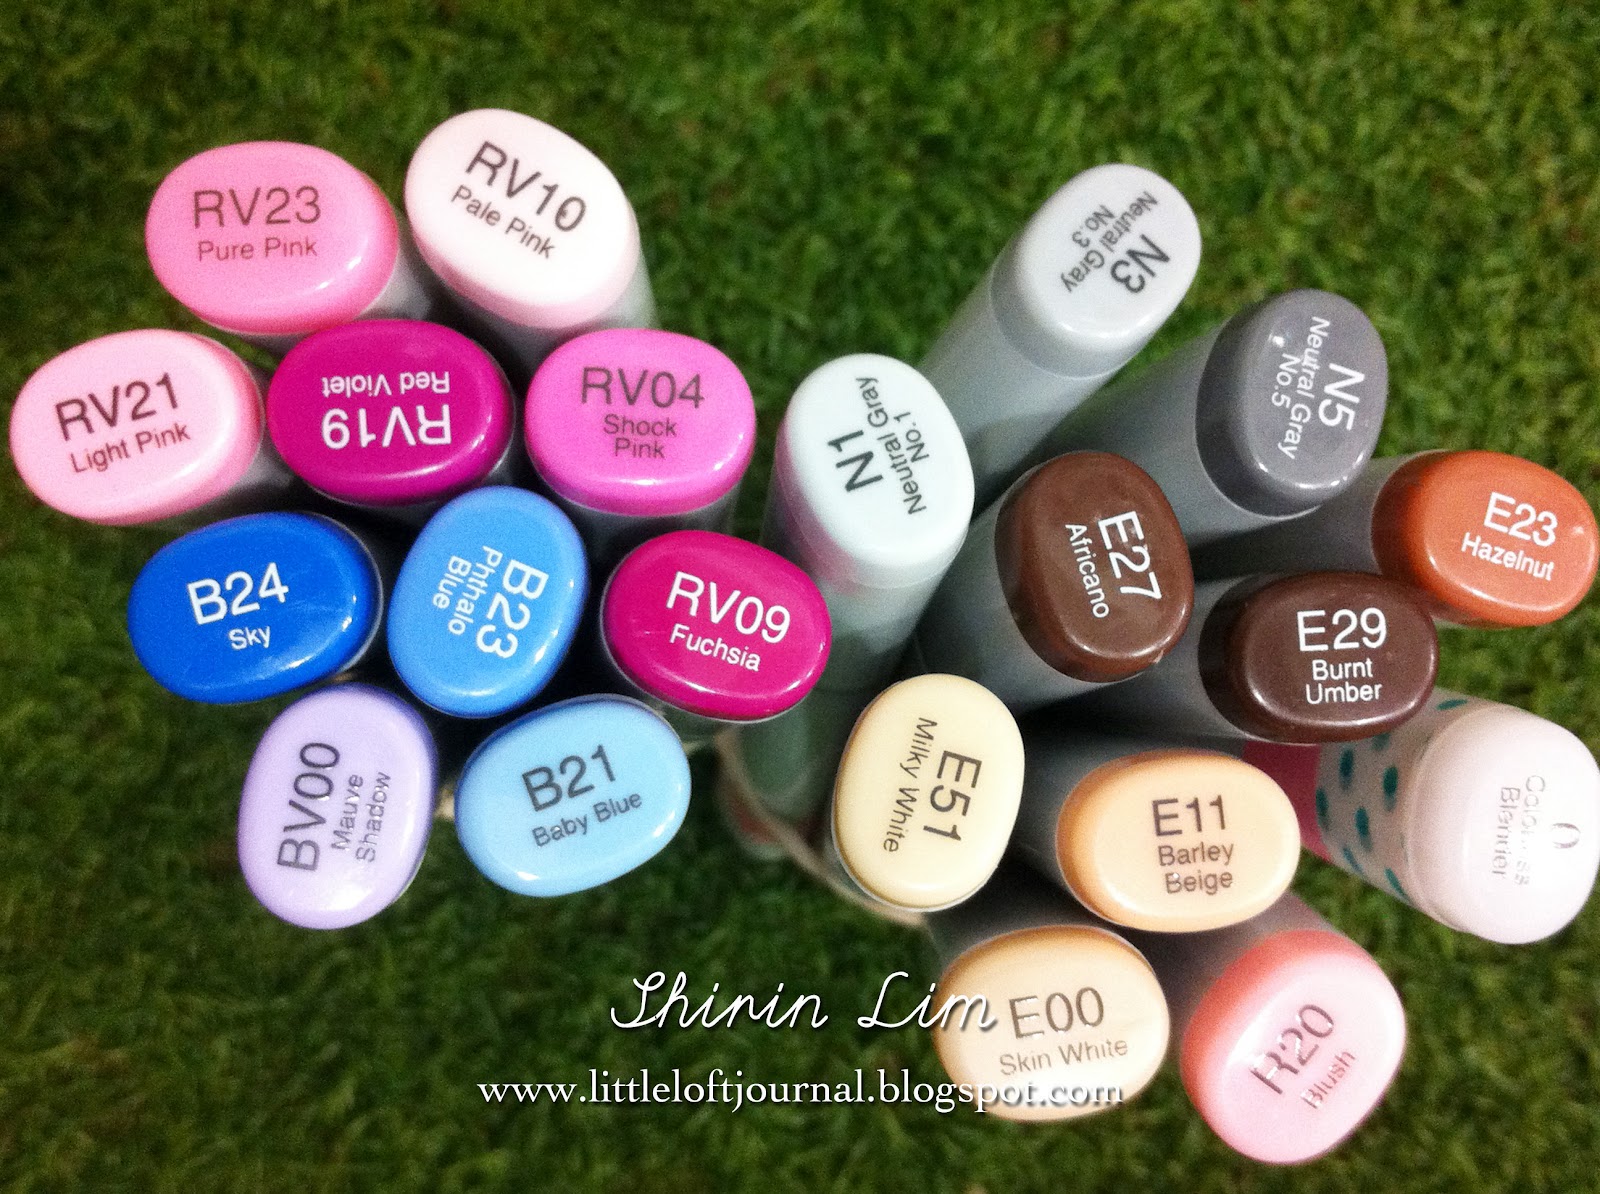
On the inside, I lined the boxes with white pearl string & added all my embellishments. I chose The Happy Couple for this project. Sweet, ya? I coloured bride & groom with different skin combo & added rosier cheeks for the bride. (Thinking of the saying "the blushing bride" when I was colouring her. ;D)
The details on the other box

The Copic markers used

Materials Used:
The Paper Shelter Digi Stamp: The Happy Couple
Papers: Xpress It Blending card, Mustard colour CS, Teresa Collins - Everyday Moments
Punches: Martha Stewart-eyelet lace edge punch
Other Materials: Cheery Lynn-Nautical Wheeler die, yellow coloured satin ribbon, white scallop edge organza ribbon, yellow colour baker twine, white pearl string, Shamrock Craft - Brass catch gold #12, 2 key, lock charm, envelope & Eiffel tower charm, Various colour roses, Distress ink: Tumble glass & Tea Dye, acetate & chipboards (For the pop-ups), Copic markers 

Wednesday, September 26, 2012

The Paper Shelter (TPS) Challenge #83 - Anything Goes

Oktoberfest is around the corner & I am invited to a party which will be all about sausages, sauerkraut, pork knuckles & lots & LOTS of beer. :)
I'm tasked to bring the pretzels & thought it would be nice if I were to pack a special one for the host.
So, here's this is the special little something for my dear friend.

I took an ordinary brown bag, cut a hole in the center to create a round window using my Spellbinders classic circle die. Then, I attached a piece of transparency on the inside of the bag so that I'll be able to see the yummy pretzels from the outside.

Cheery Lynn - Nautical Wheeler die

I added a fuchsia coloured satin ribbon & white polka dot organza ribbon to the center of the bag. To decorate the window, the doily used was from Cheery Lynn - Nautical Wheeler die. Then, I folded pleats of a floral blue ribbon & glue it around the window.


I made a topper out of a baby pink CS. Punched a decorative border with Martha Stewart - Eyelet Lace edge punch. On the top, I lined it with a white pom pom trim, a pink baker's twine & white pearl string.

Finally, I coloured the image, the Cute Bavarian girl in hues of pink & blues. I also tried colouring her in a different skin combo. Usually, I colour the skin with E000, E00, E11 & R20 but for this image, I changed the E000 with a E51 & added BV00 for shadows. The result is the image turned out slightly tanner than my usual but I still love it! :)

Copic colours used

So that's all now, folks! Cheers & have a wonderful week ahead!


Materials Used:
The Paper Shelter Digi Stamp: Cute Bavarian 
Papers: Xpress It Blending card, White & baby pink CS
Punches: Martha Stewart-eyelet lace edge punch
Other Materials: Spellbinders - Classic circles,  Cheery Lynn-Nautical Wheeler die, Transparency, fuchsia coloured satin ribbon, white polka dot organza ribbon, floral blue ribbon, white pearl string, chipboards (For the pop-ups), Signo White pen, Copic markers & a huge bag of pretzels.

Thursday, September 13, 2012

The Paper Shelter (TPS) Challenge #81 - Punch It

I was looking thru my scraps & realised that I've got heaps of them & when I said HEAPS, it's really not an exaggeration! :P So I'm proud to say that I've constructed this card purely out of my scraps. :D
1st, I chose the patterned scraps that I like & punched out a total of 8pcs of 1 1/2" circles. Frayed the edge of the circles with my scissors & inked them with Distress ink-Tea dye.


To make the flower, I punched out 5/8" circles from 3 different CS (pink, mustard & red). Folded each circle to make individual petals & glue them on 1 of the 1 1/2" patterned circles & added glitter to the center of the flower.

I didn't have a butterfly punch but do have a Martha stewart - Butterfly edge punch. I just cut out the butterflies that I liked & decorated them with different coloured glitter glues & glue them on another 1 1/2" patterned circle.

Adhere all the circles on a square, cream coloured mat. To make the perforation marks on the mat, I used a tracing wheel - sewing tool. Frayed the edges of the mat & inked it the same colour as my circles.
I love to make the most of my tools & decided to make square mat with my edge punch. Isn't it pretty?

I coloured the head of "The Sweet Gardener"  image then punched it out with the 1 1/2" circle punch & filled the background of the image with Copic marker - BG11.

I used the same image inside the card too. 

Close up of the image

Close up of the embellishment I made

Copic colours used


Materials Used:
The Paper Shelter Digi Stamp: The Sweet Gardener
Papers: Xpress It Blending card & Scraps
Punches: Friskars 2" scallop punch, 5/8" circle punch, 1 1/4" circle punch, 1 1/2" circle punch, Martha Stewart-monarch butterflies Trim double-edge punch & Pinking scallop edge punch
Other Materials: Spellbinders - Classic circles & eyelet circles, Stickles-Copper, Turquoise, Platinum & Diamond, lots of chipboards (For the pop-ups), Distress ink-Tea Dye & Copic markers.

Saturday, September 8, 2012

Join us @ TPS challenges!

Hi all! I just wanna encourage you guys to join our challenges at The Paper Shelter. Here are the details of the prizes that are up for grabs.....If you use any TPS image in your card & you are a winner, you would win a voucher worth $30! If you use images from other brands then you can win 3 TPS images of your choice. So generous, right?!

TPS really do have awesome images & it's value for your money as well! You will receive the usual black & white image in jpeg & png format as well as a coloured image in jpeg & png format & & & some images even come with a coloured background. 


So whatcha waiting for? Come on & join us now!!!

Wednesday, August 29, 2012

The Paper Shelter (TPS) Challenge #79 - Layers on Layers

I tried my hands on my own version of paper tole. I decided to use the digitally coloured image of sharing a rainy day.
1st, I decide how many layers I want (i.e. how "PoP uP" I want my image to look). Then decide not to go more than 4 layers. I'm so glad I made that decision because it took a lot more time than I expected it to.... :P However, despite that being said, the satisfaction of the result supersedes all that hard work! LOL!

Close up of the image

Lots & lots of fussy cut. Then, I pile them up with my trusty Beacon glue. (I guess it will look better if I had a silicon glue). I tried to be careful not to squash them down flat, leaving a little gap in between each layer.
I also drew my own shape mat to mat the image & obviously it was not perfectly cut like the Spellbinders Nesties ones. Heehee...

I bought a packet of Petaloo - Chipboard clouds (Color me Crazy) & love them. They come with various sizes & it's so fun because I'm able to make every single one of them different.
The original (Before pic)

The transformation (After pic)

The texture of the clouds

I covered all 3 of my clouds with 2 coats of Adirondack Metallics Acrylic Paint - Pearl. Let them dry & ink them with Distress Ink-Sugar Spun & Tumble glass. Sadly, my photo is unable to capture the subtle  hues of blues & pinks on the clouds.

For the largest cloud (1), I applied lots of glossy accents on the chipboard cloud to adhere the clear seed beads. To ensure that the beads stay put, I gave them another load of glossy accent, heat set it with the heat gun & applied my Adirondack Metallics Acrylic Paint - Pearl randomly on the top of the beads.

For the medium size cloud (2), I added lots of Stickles - Diamond. Use my heat gun to heat it till the glue bubbles so that the cloud be glittery as well as a texture to it. 

For the smallest cloud (3), I just left it with the original 2 coats of acrylic paint.


Side view of the card

The inside of the card

I finished off the card with Tsukineko - Goosebumps Clear Texture Spray to give the rain effect.


Materials Used:
The Paper Shelter Digi Stamp: Sharing an Umbrella
Papers: MME-Lime Twist collection, Violet & Dark Purple CS & Coredinations-Vienna Lake Dot paper (GX-1420-03)
Other Materials: Martha Stewart-Layered Arches punch, Stickles-Diamond, Beacon 3 in 1 advanced craft glue, Adirondack Metallic Acrylic Paint Dabber - Pearl, Clear Seed Beads (10/0) Glossy Accent, Distress ink-Sugar Spun, Tumbled Glass & Tea Dye.

Friday, August 17, 2012

The Paper Shelter (TPS) Challenge #77 - Clean & Simple

Spring is my inspiration for this week. It's a season where there's greenery everywhere & when flowers starts to bloom & birds sing to celebrate this wonderful season. The main colours I used were green, yellow & white. Green from the lush pastures, yellow from the golden honey & white from the fluffy, marshmallow clouds. :D

I also chose a simple image, "In the 20s" for this card. After I've coloured the image, I fussy cut her out & mount her against the Square die frame.
I love Cheery Lynn's die & here's another that I used - Dutch Scallop Square (DL140) to frame the image. For the background of the card, I used 3 different designs of fabric tapes (Collection: Enfant) from Love My Tapes.

 Coloured her blonde with beautiful green eyes. I wanted to give her Cloche hat texture so I coloured it in random shades of brown to give the hat a felt, woolly look.
To keep the simplicity of the card, I decided to place the sentiment inside the card rather than my usual outside & further decorate it with fabric tapes.

Close up of the image

The sentiment

Copic colours used

Hugs & have a blessed week ahead!


Materials Used:
The Paper Shelter Digi Stamp: In the 20s
Papers: Xpress It Blending card, White, green & Yellow coloured CS, Scraps
Other Materials: Anna Griffin - 3D cardstock sticker (Palmer collection), Paper roses, lots of chipboards (For the pop-ups), Cheery Lynn - Dutch Scallop Square (DL140), Glossy Accent, Distress ink-Tea Dye & Copic markers & multiliner.

Wednesday, August 1, 2012

TOMIC Challenge #55 - Christmas in July (Colour & theme Challenge)

For this challenge, we have to create a card with these colours:  RED, GREEN and WHITE Stars must also be used. It's Christmas in July theme.

Front of the card

My initial idea was to make an apperture card but I decided to spice it up with two flaps. The card is held together with a sentiment tag, which I layered using diecuts & a pair of velcro. I think the flaps just adds a little mystery to what is  in the card.
I wanted to create a story for the card & so the story goes.... one night, 2 little girls are playing pretend play. One of them pretended to be an angel & wanted to make a beautiful sky filled with twinkling, sparkling stars & guess what? Magically, it actually did happened! & the other girl just leaped in joy at the beautiful sight. :)


I covered the background with the stars that are diecut out from doohickey die - Starlight Lace, inked every single 1 of them & added stickles-star dust to create the glittery & twinkling effect. It's tedious but I think the effort is worth it! Don't you agree?

I tried paper piecing for Tilda's blouse & added C1 & C3 (Copic markers) to create the dimension. Don't you think it's just adorable? :)

Other than the face colours (E000, E00, E02, E11 & R20), these are the rest of the colours.


Materials:
Magnolia Stamps: Celebration Tilda (Sweet Crazy Love 2012 collection),  Starlight Tilda (Merry Little Christmas 2010 collection), Santa Bench (Santa Collection 2008) & Post -Vintage Merry (So Jolly & Under the Mistletoe 2009)
Doohickey Die: Starlight Lace
Papers: red, yellow, cream & green coloured CS, Theresa Collins - Spring Fling Collection
Other Materials: Chipboards (For pop-up effect) Sei - Christmas Mint collection, gold bead trimming, cream crochet lace, mint coloured satin ribbon, Stickles - Star Dust, Spellbinder Grand Nestabilities die - Grand Circles & Grand Scalloped Circles, Spellbinders Nestabilities die - Label Four,  Distress ink-Tea Dye, Memento Tuxedo Black ink, Copic Multi Liner 0.1 & Copic markers.